

ESP32 TouchDown - All-in-One ESP32 Capacitive Touchscreen Board
Author: Dustin Watts
Open-source ESP32 TouchDown PCB with ESP32-WROOM-32D, 480x320 capacitive touchscreen, USB-C, microSD, and LiPo charging.
Main components
Share
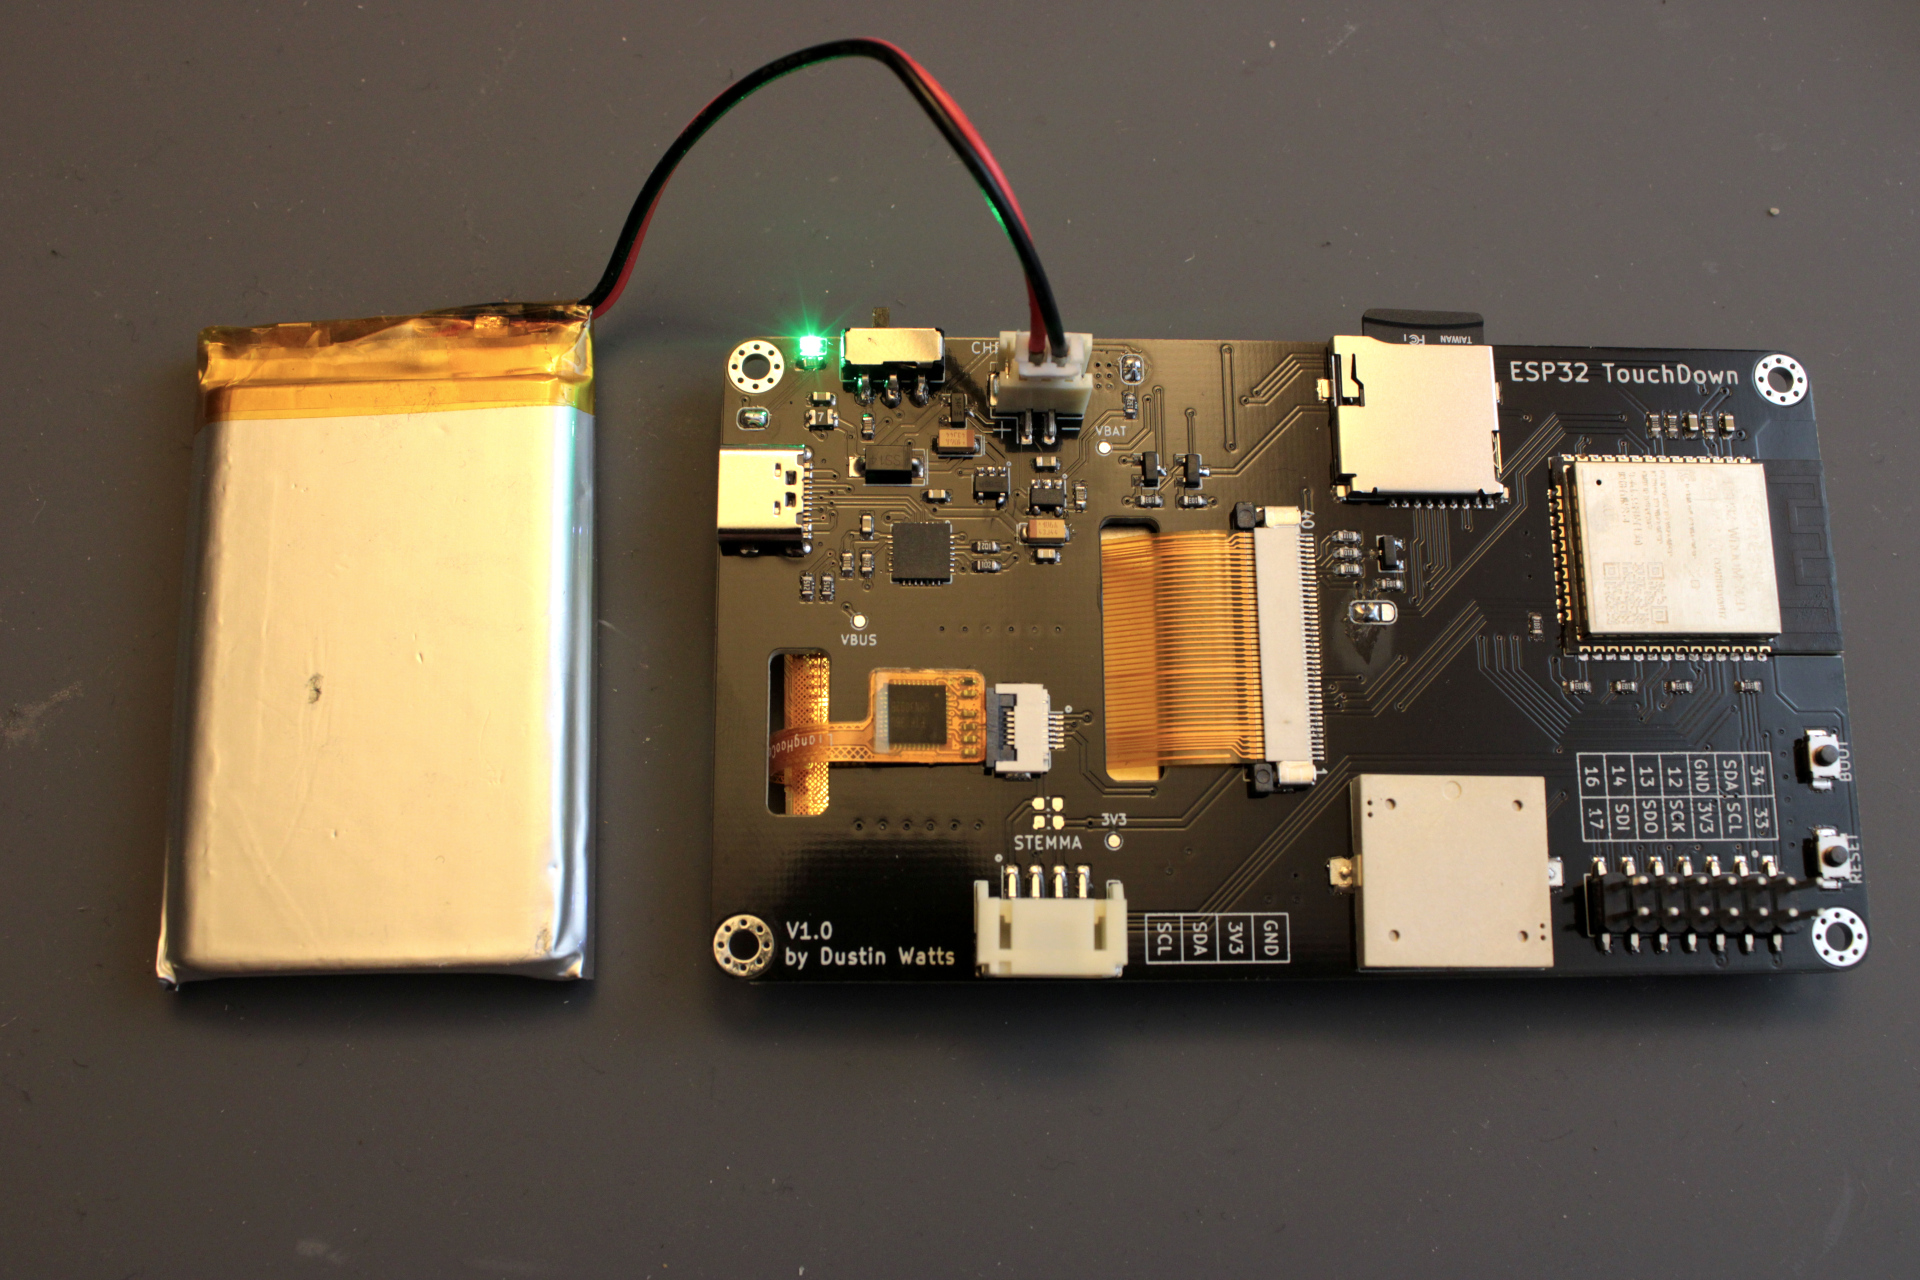
PCB photos
Quick Specs
- Main IC
- ESP32-WROOM-32D
- Status
- Concept
What it is
An open-source all-in-one development board that puts an ESP32-WROOM-32D, a 480x320 capacitive touchscreen, and battery charging on a single PCB. It was designed for FreeTouchDeck so there was no need for a separate ESP32 dev board plus a wired-up touch display.
Main components
- ESP32-WROOM-32D (WiFi/BLE)
- ILI9488 480x320 TFT screen, 4-wire SPI
- FT62x6 capacitive touch controller (I2C, address 0x38)
- MCP73831 LiPo battery management IC
- CP2102 USB-to-UART bridge
- USB-C connector
- microSD card holder
- Stemma/JST-PH I2C connector
- Passive buzzer (GPIO26)
- Battery voltage divider (GPIO35)
- 12 unused GPIOs broken out to a header
What you can use it for
- Standalone touchscreen control panels (e.g. FreeTouchDeck macro decks)
- Battery-powered handheld IoT devices with a UI
- Sensor dashboards and status displays
- Any project that wants ESP32 + capacitive touch without wiring a separate display module
Notes before use
- Nastrotek has not independently fabricated or tested this board yet.
- Review the schematic, PCB layout, BOM, and license before manufacturing.
- Two hardware revisions exist (Rev1 and Rev1.1) with minor component substitutions (voltage regulator and battery-management IC) — check
changelog.txtin the source repository for details. - The TFT backlight power source is jumper-selectable between 3.3V and GPIO32 (PWM-dimmable); confirm the jumper/solder-blob state matches your revision.
- Uploads use the standard "ESP32 Dev Module" board profile in the Arduino IDE.
Source / reference
Original hardware design by Dustin Watts.
Images and documentation retained from the source repository are attributed to © Dustin Watts under the project's MIT License. Nastrotek edited the introduction only and does not claim ownership of the original design.
How to evaluate this board
Read this resource as a starting point for review, not as a board you should manufacture blindly. Open the schematic first and identify the power input, regulator path, MCU or main controller, external connectors, programming interface, and any sensor or display interfaces. Once the functional blocks are clear, it becomes much easier to decide whether the design matches your project.
For ESP32 TouchDown, I would review the display/touch connector first, then the ESP32 boot pins, USB/programming path, LiPo charger, backlight current, antenna keepout, and mounting holes. The board is useful because it integrates many things, but that also means one enclosure decision can block the USB port, battery connector, or reset access.
Before reusing the files
- Check the license and original author notes.
- Confirm voltage levels before connecting external modules.
- Verify connector pinout against your cables and sensors.
- Review BOM availability before ordering PCBs.
- Export fresh Gerbers from the design tool if you modify anything.
- Treat untested designs as references until you have fabricated and measured them.
Good use cases
This kind of resource is useful when you want to study a real open-source hardware design, borrow part of a circuit, or compare layout decisions before creating your own board. Even if you do not fabricate the PCB directly, the schematic can still be valuable as a reference for power design, connector planning, enclosure constraints, or firmware bring-up.
For a small product prototype, the best workflow is to reuse ideas carefully: copy the principle, not the entire board without context. Mark what you changed, keep notes on assumptions, and add measurement points so the first fabricated board can teach you something useful.
Related reading
Download Resource
File details & download
- File type
- Design File
- Version
- Not specified
- File size
- Not specified
- Author
- Dustin Watts
- Original source
- Open original source · github.com
- License
- Not verified
- Commercial use
- Not verified
- Last checked / updated
- Jul 31, 2026
- Tested by Nastrotek
- Not verified
The license has not been verified. Do not assume this resource is free to reuse, redistribute, or use commercially.
| File | Format | Status |
|---|---|---|
| 3D model | GLB | Preview |
Share
Keep exploring
Read next
Related articles
Net Classes and Trace Width: When Should a PCB Trace Be Wider?
A practical guide to PCB net classes and trace width for small boards: signal traces, 3V3, 5V, battery paths, ground, power vias, and a pre-Gerber checklist.
PCB Ground Planes: GND Is More Than a Net Name
A practical guide to PCB ground planes, return current, GND layout mistakes, stitching vias, decoupling paths, and copper pour checks.
Choosing Capacitors for Electronics: Simple Part, Easy Mistake
A beginner guide to choosing capacitors for circuits: capacitance, voltage rating, decoupling, ceramic types, DC bias, and ESP32 values.