

First Notes On Hardware Design For Small Products
Initial principles for designing hardware for a small product: scope, power, PCB layout, firmware, and debugging.
Share
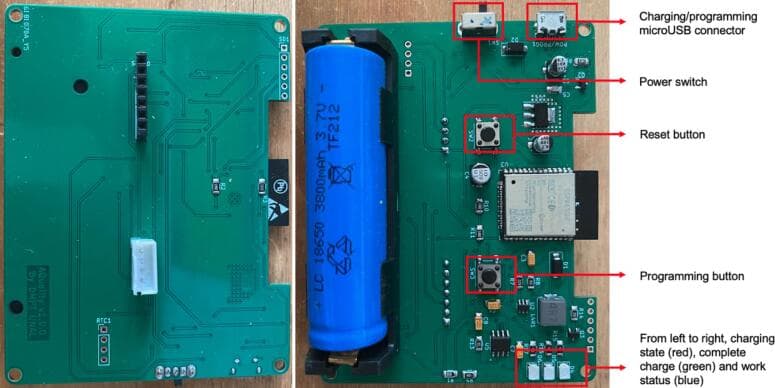
Start With A Small Scope
When designing hardware for a small product, it is easy to add too much to the first version. One more sensor sounds useful. One more connector feels safer. One small display makes the product feel clearer. But every extra part brings power, signals, board space, firmware, testing, and possible failures.
My first note is simple: choose a small scope for the first prototype. The board should answer the main question, not every future question.
Power Should Not Be Treated Lightly
Power is less exciting than sensors or screens, but it decides many things. A circuit that works on a desk may fail when a motor starts. A module that works alone may become noisy when it sits near a power section.
For a small product, I want to define the input power, expected current, sensitive blocks, and debug points early. Test points do not make a product prettier, but they make debugging easier.
PCB Layout Should Be Testable First
A small PCB is attractive, but the first board should be easy to inspect. If parts are too close, hand soldering becomes harder. If labels are missing, debugging slows down. If there are no test points, every measurement becomes awkward.
The first PCB should make learning easier. Later versions can become smaller and cleaner after the main assumptions are verified.
Firmware Affects Hardware Decisions
Hardware does not stand alone. If firmware needs frequent updates, the board needs a convenient programming port. If logs matter, UART or another status output should be easy to reach. Even a simple status LED can save time during early testing.
Small hardware decisions often shape the firmware workflow. It is better to plan for that early.
Write Notes For The Next Version
Every hardware pass contains small decisions. Without notes, it is hard to remember why a regulator was chosen, why a pull-up value was used, or why a connector sits on one side of the board.
The goal is not a perfect tutorial. The goal is to write enough context so the next version starts with less guessing.
A practical first review pass
Before a first board is ordered, I like to review it as if I will have to debug it with only a multimeter, USB cable, and a few spare wires. That mindset changes the design. It makes test pads, labels, connector orientation, and power indicators feel less optional.
The first board should expose the uncertain parts of the product. If the regulator might run warm, leave room to measure it. If a sensor pinout is not fully trusted, make the connector easy to probe. If firmware upload depends on boot pins, make sure those pins are reachable and documented on the silkscreen.
What to postpone
It is usually fine to postpone cosmetic optimization, tight component packing, and unusual mechanical tricks until a later revision. Early hardware should be honest and measurable. A board that is slightly larger but easy to debug often moves the product forward faster than a beautiful board that hides every signal you need to inspect.
References
These sources are useful background material for checking terminology, limits, and engineering recommendations before applying the notes to a real prototype.
- Espressif ESP32-S3 Hardware Design Guidelines
- KiCad PCB Editor documentation
- Analog Devices: Staying Well Grounded
Related reading
Share
Keep exploring
Read next
Related articles
What Is a MEMS Microphone? From a Silicon Diaphragm to ESP32 Audio
Learn how MEMS microphones work, how analog, PDM, and I2S outputs differ, and how to avoid PCB, power, and acoustic-port mistakes.
ESP32 Battery Power Design: From USB-C Charging to the 3.3V Rail
Review an ESP32-S3 battery power path from USB-C and TP4056 charging to protection, load sharing, 3.3V regulation, and load budget.
Complete Hardware Architecture for an ESP32-S3 Mochi Robot
A practical breakdown of ESP32-S3 Mochi Robot hardware: display, touch, I2S microphone, amplifier, speaker, battery, charging, and GPIO.